
Are you looking for an effective composting solution that’ll keep your plants growing well? Are you really tired of the store-bought fertilizers? Do you want something more natural for your wonderful plants? Look no further, a worm farm can provide you with nutritious soil and fertilizer year after year.
And guess what, you don’t even need to spend much money on this way of composting. Worms produce compost and compost tea that can enrich garden soil. This is not only interesting for gardeners but also for greenhouse gardeners specifically. Having a worm farm for your greenhouse will create a more sustainable growing environment.
In fact, the benefits are more than what you might have heard. Don’t get so worried just yet, you’ll discover all you need to know about greenhouse worm farming, the benefits, how to start one, and how you can manage it.
What are worm farms?
Worm farms generate natural and nutrient-dense compost. A worm farm ideally consists of a container, a bedding material, and the worms!
The worms themselves break down waste materials and in turn, provide rich nutrients for your plants to grow.
So, worm farms do not only create natural fertilizers, they also help to get rid of certain waste materials.
Worm farming is also known as vermiculture. It is a simple and effective method of creating natural fertilizer and rich soil involving organic recycling. Fruits, vegetables, and food scraps from the kitchen, greenhouse, or garden are turned to compost.
It is an easier means of composting organics from the comfort of your home. In the end, you’ll benefit from well-grown worms that provide a nutrient-rich fertilizer for your greenhouse, garden, and houseplants.
Are worm farms worth it? See the benefits…
Do you wonder what benefits a worm farm could bring you? Well… Worms are like “ecosystem engineers.” The reason for this title is that they’re natural soil conditioners. They improve the physical, biological, and chemical conditions of the soil.
While organic waste eventually becomes fertile soil, an earthworm can do this process faster. They are literally organic recyclers that convert organic waste into nutrient-filled material. This is possible because they unlock the nutrients within plant materials as they digest them.
5 direct benefits of worm farming that’ll change your greenhouse gardening practice
1. Simple and affordable gardening
It’s easy and inexpensive to build a homemade worm farm and it can reap benefits for the garden. You can get started on your worm farm by purchasing stackable worm composting systems or you can build your own out of two plastic containers.
2. Recycling of your organic waste
Worm farming proves that nothing in itself is a waste. Instead of throwing away kitchen scraps or plant materials, a worm farm will transform them into fertile substances. These “soil conditioners” can be used to boost the growth of your plants.

3. Building a greenhouse balance
During this recycling process, worms take oxygen from their surroundings and produce carbon dioxide in return. Plants need carbon dioxide to survive. They will produce oxygen from this CO2. This results in a perfect natural equilibrium within the greenhouse.
4. Cutting down your expenses
By reducing the amount of waste, you are eliminating some waste disposal costs. In addition, you’ll quit purchasing fertilizers by recycling the waste with worm farming. If you like to fish, you’ll also have some bait on hand all the time.
A single worm can multiply to no less than 1500 worms in just a year. They are smart though. If you don’t feed them enough, they don’t reproduce. So, don’t worry about them becoming too many.
5. Fun project for kids
Many of the worms sold in the stores are pets. Oh, what a creepy thing! , you may think. But think of it this way: it can keep your kids busy and teach them biology. So, why not start a worm farm with your kids?!
It’s something so simple that your kids can take care of. Let them do the feeding and gathering the scraps themselves. Don’t be surprised if the kids take over the management of the worm farm all together.
6. Worm tea will serve a dual purpose
Beyond being a magical soil conditioner, the liquids you collect from your worm farm will add a second benefit to your garden.
Worm tea or juice as it’s usually called is a natural insect repellent. It can also stop root rot. Applying it on the leaves until it drips into the soil is enough to protect from the rot and foliar pathogens.
Which is better: regular compost or worm farms
Composting can be done in various ways. Worm farming is just one of them. The traditional compost we know of is the one which usually has to do with decomposing plant materials on a big pile. In this method, worms only play a minor role. It also takes longer.
Microbes like bacteria and fungi work together with insects and worms in order to convert the waste and plant materials into compost. Worm farms will eat the waste so that microbes aren’t necessary at all.
The normal composting often generates a foul odor and it needs a certain temperature to mature.
When you shouldn’t start a worm farm
No doubts, I would advise you to go into worm farming. However, there are a few situations when worm farms are not the best choice.
- You don’t produce enough food waste every week. If you are not cooking often or you are living alone, you may not produce enough waste. They need regular feeding because they won’t be able to get anything from nature as they are in an enclosed system.
- If you want to decompose garden materials, such as branches, shrubs, and other bigger and harder materials, you’ll need a regular composting method for this. Earthworms won’t be able to digest this. They feed on soft and smaller materials.
- If you’re living in an area where earthworms are invasive (non-native), DON’T START A WORM FARM!! I cannot stress this enough. This is something you always have to check, whether you’re planting something or using critters for anything. Never use something non-native that cannot be controlled. Earthworms are hard to control and it’s a real problem. They have been released on fishing trips as well as with soil from worm farms.
- If you cannot take care of it regularly. A worm farm is like a pet. You can’t just go on a vacation and leave them behind. You have to arrange some feeder.
A step-by-step guide to setting up your worm farm
Relax, it’s a lot easier than you may think. There isn’t much to it. In fact, there are multiple ways to set up a worm farm. This one focuses on a DIY bucket method.
To set up the worm composter, you would need the following:
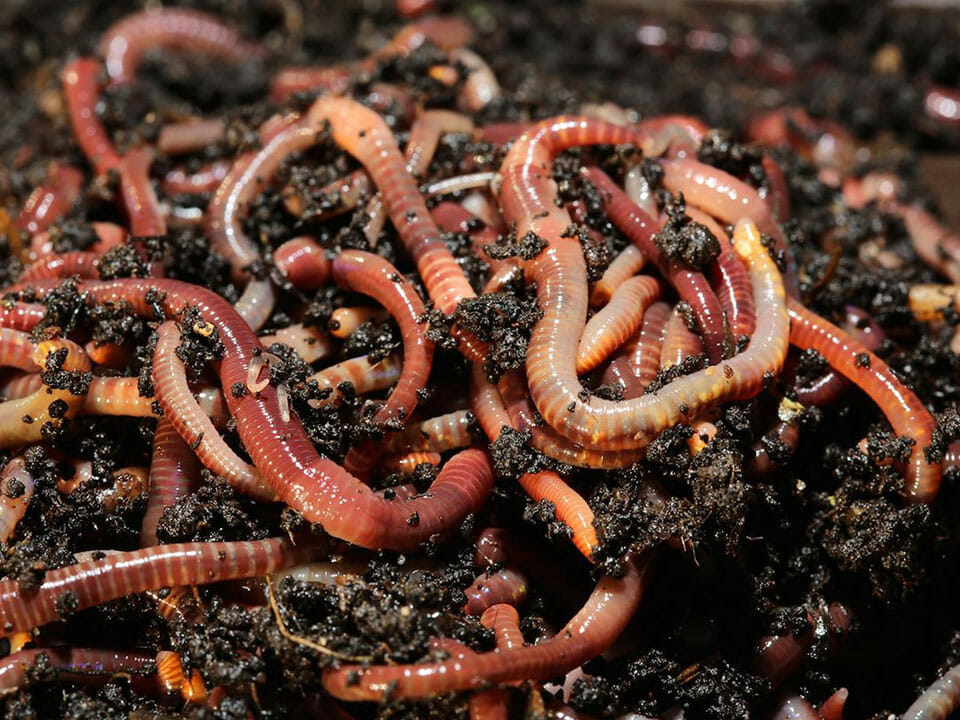
The worms!
Wait! Not any kind of worm. You need a species called red wiggler. It’s the most commonly used, and you can get them in the bait shops or gardening centers. You can also get from any fellow gardener involved in worm farming.
One thing that makes it the best choice is that a single of it is worth a thousand more. It multiplies but is still able to maintain its population growth based on the food available.
2-3 non-transparent plastic bins
The typical way is using stacking bins made of any kind of material. However, you can make use of the readily available plastics bins sold at supermarkets.
The bins cannot be the see-through ones and have to be a dark material. This is because worms aren’t like we humans. They abhor light so you must keep things as dark as possible.
Other materials needed:
- A drill
- Two bricks
- Newspapers – shredded or torn into pieces (1-inch strips)
- Kitchen scraps (more info below)
Instructions on how to start a worm farm
Step 1: Get the buckets ready
First, you should clean the buckets thoroughly. You don’t want harsh chemicals or microbes in the buckets. If you clean them with a light bleach solution, let them air out in the sun for a couple days.
Drill holes into the bottom of one bin. This one will go on top where water can drip out into the bottom bin. You should use small holes but plenty of them.
If you want to have less compost falling into the leachate (worm tea), you can use 2 bins at the top. In this case, you also need holes at the bottom of the middle bin.
Using the drill, make a series of holes in the top side of the bins. The next thing you’d do is to take the lid, turn it upside down, and drill as many holes as possible. This will help with aeration. Without enough oxygen, the worms will suffocate.
Step 2: Place the bricks in the second bin
And let the bin with holes to sit on it. The purpose of this is to allow the water to drain into the bin at the bottom.
In case of the 3-bin setup, you would add small bricks between the top and middle bin as well.
Step 3: Fill the top bin
Now that you’ve created the set up for the worm farm. Fill the top bin with moist newspapers and cardboard. Ensure that you don’t put papers with glossy colors in it.
In order to make it moist, use distilled or filtered water. You can also let water jugs sit in the sun for 3-4 days so that chlorine can evaporate.
Step 4: Add the compost and some worm food
You’ll need some compost to speed the process. In case you don’t have any, your garden soil will do just fine. Mix it with the shredded newspapers.
The next thing you’d do is to add the waste. Be careful so you don’t put any oily or acidic fruits inside. Put in the scraps like bread first. The greens should come last so it doesn’t overheat.
Step 4: Introduce the red wriggler
Carefully introduce the worms to their new habitat and ensure they’re evenly distributed. They need space so stuff the bin to brim with food.
Step 5: Give them time
Remember as it is with humans. Lovers take time to bond well. Your new friends will need a little time to adjust to the new environment. Don’t be in a haste, they’ll certainly pick up.
You have to be consistent in feeding them. At least, once a week should do.
Feeding The Worms: The Do`s and Don’ts
Dos
Most fruits, vegetable scraps, cooked food, moist paper, leaves, coffee grounds, and soft scraps are best for feeding worms.
You can also add eggshells, bread, cheese, and tea bags. If you have some dinner rests such as potatoes, rice, and pasta, you can feed it to the worms too.
Don’ts
Remember, you aren’t feeding a dog.
Citrus, onion, spicy foods, garlic meats, and oily foods aren’t the best for worms. Absolutely avoid meat or dairy products.
How do worm farms work?
As time goes on the worm feeds on the food substrates. They release their excretes which ends up decomposing to form a dark brown compost like the color of a coffee.
Most people call this worm poo.
This digestion process increases the carbon dioxide (CO2) profile of the greenhouse. As they take up oxygen that is let in through the drilled holes, carbon dioxide is released.
It’s a mutual relationship between the garden and the worm bins. An exchange of life. Having more worm bins situated in the greenhouse is an easy way to maintain balance.
Green waste becomes food to the worms which pay their debt in due time by supplying worm cast and juice to the garden. That’s equilibrium, a sustainable ecosystem within a closet.
Ready-made worm farm vs. DIY worm farm
Yes, your guess was right. You must be asking: do I need to go through all this stress to make a worm farm? Aren’t there ready-made ones by experts?
Maybe you are unsure if you’ll get it right on a first try. The fact is, nothing is perfect at a first trial. Practise is king. And if you read carefully the steps I gave you, you’ll build a nice worm farm. However, DIY isn’t for everyone.
In case you don’t have the time or inkling to work on it, there are affordable and professionally made worm farms. Some of them include a whole starter kit that will get you ready in no time.
You’ll enjoy easy composting procedures, increased airflow, and an easy fluid tap. At the end of the day, your DIY worm farm might not achieve this.
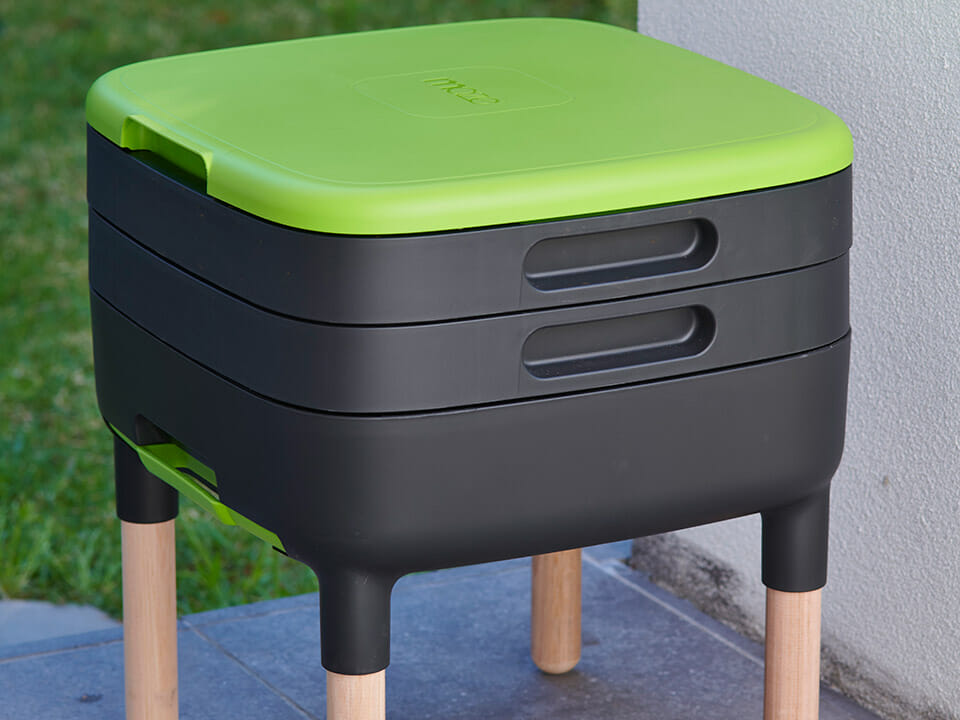
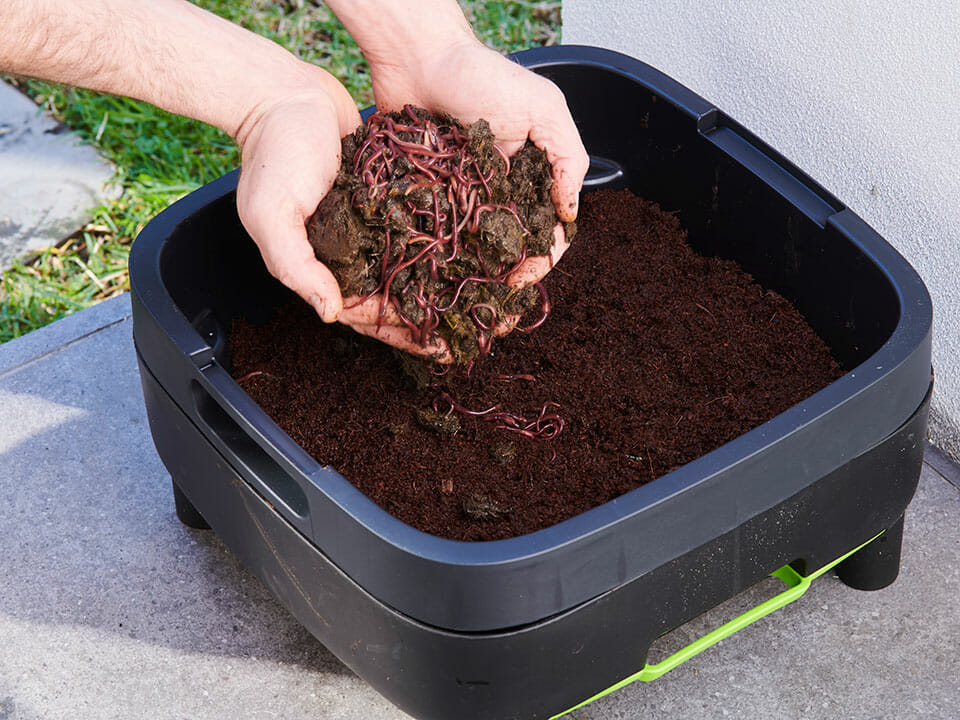
What is a great worm farm for starters?
We always like to recommend MAZE composting products because they are made with an eye for convenience. The MAZE Worm Farm has a stackable design with a 2-tray layout and flexible options. You can add legs to increase the height. You can get a shelf and second unit so they keep a small footprint.
You can begin with this MAZE starter kit if you want to get started in the most efficient and timely way possible. It comes with red wigglers and coconut peat as a starting material.
“A stitch in time saves nine.” – Work with that principle. Now that you’ve got all your confusion about worm farming cleared, why not go for it right away. Don’t forget that even the kids can manage it. Your garden needs to be nourished with the fertile worm farming compost and the children will love playing with their new pets.